$ ./pychecksum.py -h
usage: pychecksum.py [-xvg] [--md5|--sfv] (-cFILE | [-oFILE] [-bPATH] file1 [file2] [-i PATH1])

options:
  -h, --help   show this help message and exit
  -g, --gnome  use the gnome interface
  --md5        check or create MD5's
  --sfv        check or create SFV's
  -iDIR        ignore given dir
  -x           expand the details on stat-up
  -v           print status on the console
  -cFILE       verify checksums stored in FILE
  -oFILE       store checksums in FILE
  -bPATH       compute paths relative to PATH
  -fPATH       compute PATH's checksum and store it in PATH.{md5|sfv}
  -dPATH       compute PATH's checksum and store it in PATH.{md5|sfv}
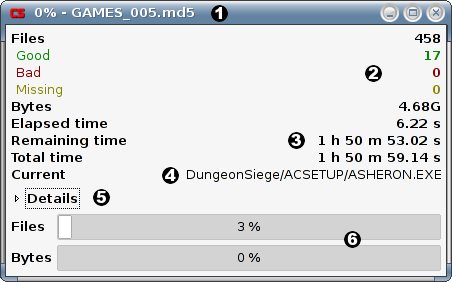
Window Layout
The program consists of only one window. I have try to show as much useful information without cluttering the interface too much.
-
The Title Bar displays the name of the sum file and how much of it has been processed so far. The percent is computed based on bytes, not files processed.
-
The top part of the window shows the general statistics of the sumfile:
-
the total number of files (Files)
-
if we are verifying a sumfile, the Bad, Good and Missing files detected so far
-
the bytes of all files (Bytes)
-
-
Bellow the file statistics we have the time statistics. These are the elapsed, remaining and total times. The remaining and total might change a lot and are only informative.
-
The Current label shows what file is processed at that moment. After finishing the processing, it will show the state of the processing (for example ALL FILES ARE OK)
-
The Details allows you to have more verbose info on what’s going on. Expanding it might decrease the processing speed, so it is better to wait till the processing is over. Once the processing is over, you will also be able to show only certain items using the filter controls (Good, Bad and Missing checkboxes)
-
At the bottom of the window we have two progressbars: one for the files processed and one for the number of bytes processed. The percentage represent the progress done so far relatively at the total number of files and, respectively, the total number of bytes to be processed. The pecentage of bytes processed is the shown in the title bar, too.
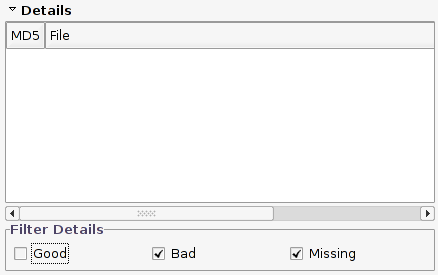
The Details view
By clicking on the small triangle located in front of Details label, you can show or hide the list of files processed. During checking, a small icon will be displayed in the front of each file, showing its good, bad or missing status.
|
Note
|
By default, the program starts with the Details collapsed. You can force it to start with the Details expanded by using the -x switch on the command-line. |
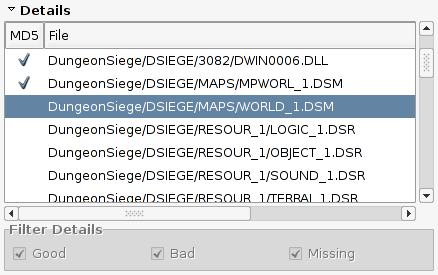
Bellow the list of files, there are three checkboxes:
-
Good
-
Bad
-
Missing
They are used for filtering the files shown by the details listbox and are active only after the processing of all the files has been finished. Until that time, all files are shown.
|
Note
|
You can click on the column headers from the listbox to sort the files after that column (for example, to sort after the good, bad or missing status, or alfabetically) |
Finished processing
After processing all the files, the program will display the status in the Current label. For a verification of some checksums that went without any trouble, this will be ALL FILES ARE OK.
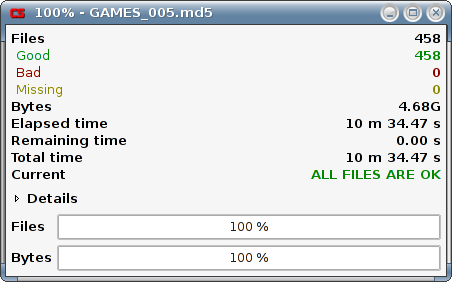
After finishing the processing, the checkboxes from the Details will be active and you will be able to filter what files to show and what to hide.